- Understanding and creating KPI’s for your Start Center
- Creating Bar/Pie chart portlet for your Start Center
- Creating a result set query in Maximo
- Working with the Bulletin Board in Maximo
- Getting started with Maximo Start Centers
The ultimate goal of using start centers is to utilize the power of KPI’s and result sets for quick access to some important information. This information can be useful to your users for quick access to things but it can also affect performance (more on this later). So what is a KPI? It stands for Key Performance Indicator. You use KPI’s to measure performance within your Maximo system. An example of a KPI is when you want to measure what percentage of work orders are completed in a timely manner. The KPI chart would show you a percentage, let’s say 85%, and then have three visual queues to say what is acceptable and what is not. For example, it will show a red area when your percentage of completed work is %50 or less and a yellow area where the percentage is between %50 – %80. These ranges are set by you based on how you see fit. From this KPI, you can then determine how your crew is performing and if it’s acceptable or not.
In the Key Performance Indicator Manager application, you create key performance indicators to track critical performance variables over time and you can view key performance indicators in the start center or with the key performance indicator manager.
Historical trends and values for key performance indicators
The following three tabs display historical information that pertains to key performance indicators:
- On the Historical Trends tab, you view key performance indicators over period of time, compare key performance indicators, and view historical values.
- On the Trend tab, you view a chart of a selected key performance indicators over a specific period of time. The chart can display in days, weeks, months, or years. You also can compare other key performance indicators to the selected key performance indicator.
- On the Historical Values tab, you view data points for individual key performance indicators for a specific period of time.
Creating a Decimal Type KPI
In the Key Performance Indicator Manager module (Go To -> Administration -> Reporting -> KPI Manager), click on create new KPI. The first type of KPI we will create is a decimal KPI, so in the ‘Calculation Type’ dropdown, select ‘Decimal’. We will name this ‘Work Order Overdue’. First we have to enter a select statement. Now you can just enter any SQL except the statement has to be an aggregate function, which essentially returns a single number value (click here to learn more about SQL aggregate functions), so enter this:
select count(wonum) from workorder
Now we can enter the ‘where’ clause. Enter this:
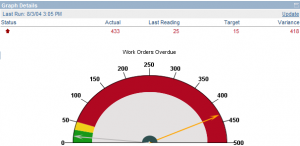
where status not in ('COMP', 'CLOSE') and istask = 0 and targstartdate < sysdate Notice I am using ‘sysdate’, this is database specific so make sure you use the right syntax according to your database. If you are using SQL Server, you would use the getdate() function. Now we set the KPI parameters according to what we think is appropriate as for as performance goes. So in terms of the number of work orders that are overdue, we probably don’t want to many, so we can set the acceptable amount or the ‘Target’ value to 15.00, then we set the ‘Caution At’ value to 30.00 and ‘Alert At’ value to 50.00. So anything equal to or above 50 workorders is an unacceptable performance indicator. Once you have created the query had a chance to run, your KPI should look something like this:
Creating a Percentage Type KPI
So now let’s create a percentage type KPI, simply create a new KPI, name it ‘PM Performance’ and change the ‘Calculation Type’ to ‘Percentage’. Now the SQL statement here is a bit different. We will enter a value for ‘Select’ field but leave the ‘Where’ clause empty as that field is optional. So the goal of the SQL statement here is to return a value that is within a percentage range of 0-100. Here is what the SQL statement looks like:
select distinct (select count(wonum) from workorder where status in ('COMP','CLOSE') and worktype = 'PM' and istask = 0) /
(select count(wonum) from workorder where worktype = 'PM' and istask=0) * 100 from dummy_table
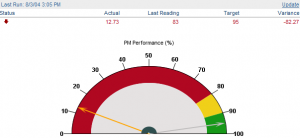
As you can see in this query here, we are selecting a count of the work orders that are completed or closed divided by the total count of workorders, then we multiply that by 100 to get a percentage value. Then we can set the ‘Target’, ‘Caution At’, and ‘Alert At’ values to 95.00, 90.00 and 80.00 respectively. The percentage KPI will look something like this:
Adding the KPI to your Start Center
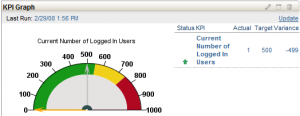
You can add these KPI’s to your Start Center simply by adding it just like you would a result set portlet. Instead, you can choose ‘KPI Graph’. Once you add the portlet, you can then edit it to choose which KPI you want to show. It will look something like this:
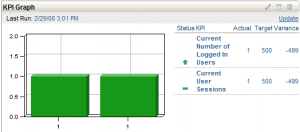
You can also add as many KPI’s as you want to show in one graph. Here is what a KPI Graph looks like in a Start Cetner with two different KPI’s:
Running your KPI’s
By default, your KPI’s or SQL statements are scheduled to run based on how you setup your cron task. There is a built in cron task called ‘KPICronTask’ in the Cron Task Setup application. Because of the nature of some SQL statements, it can be a performance issue, so you can schedule your cron task to run everyone night during off peak hours. These will run your SQL queries and save them to a database. The next time you log in to your Start Center, you will see the latest value that was calculated in your KPI. Optionally, you can manually update your KPI by clicking on the ‘Update’ link within your KPI Graph portlet in your Start Center.
Historical Trends
Whenever your cron task runs or whenever you update your KPI so that it executes the query you specified, Maximo saves the value in the database so you can view historical values and you can do some trending on it. This is pretty straightforward in that all you really can do is view the values based on a date range either by dates, by week, 2 weeks, month, 3 months so on. You can also select other KPI’s to compare historical data with.


